Products
Solutions
Resources
9977 N 90th Street, Suite 250 Scottsdale, AZ 85258 | 1-800-637-7496
© 2024 InEight, Inc. All Rights Reserved | Privacy Statement | Terms of Service | Cookie Policy | Do not sell/share my information

The concept behind sharing a dashboard evolved as a means to save time and energy for those working together who share similar data needs. Sharing a dashboard may be a perfect option when the original dashboard doesn’t need to be edited by the person who is viewing the shared dashboard. Collaboration goes a step further by granting the person with whom the dashboard is shared, permission to collaborate on and edit the dashboard. Think of collaboration as a subset of sharing, meaning you cannot collaborate on a dashboard until the dashboard is able to be shared. Only system dashboards that you personally have edited and renamed can be shared.
To share a system dashboard you must first save it as your default dashboard, re-save and re-name the dashboard, and then you can share or collaborate.
The word "Default" after the dashboard name represents your default dashboard, and Sharing is grayed out and unavailable as it is a default dashboard setting.
Initially, no single dashboard in InEight Explore is considered your default dashboard. Until you choose to share a dashboard, or collaborate with others, does it become an important function.
In order to share or collaborate with others on a dashboard you initiate, it must first be set as your default dashboard.
• You have now set (or changed) your default dashboard
After a dashboard is shown as your default, the Sharing option becomes available to you.
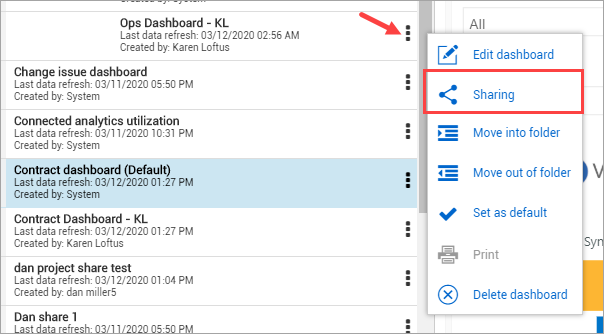
The Operations Dashboard below does not have the Sharing option available as it is a System dashboard and it has not yet been set as the default and re-named.
Conversely, the personalized, re-named dashboard called Ops Dashboard – KL has the Sharing option available.


Elevated permissions are required to share at the project and org level.
Use caution when using the Organization option, as all individuals will see this new dashboard option upon their next sign-on to Explore.
With each new log in to Explore, newly shared dashboards will show the yellow New! tag next to the dashboard name. Afterward, the New indicator will not show. Hovering over the Share icon indicates if the dashboard is being shared with you, or if you are sharing the dashboard with others.
A black Share icon indicates a dashboard is shared by you.
A blue Share icon indicates a dashboard is shared with you.
Click the blue Sharing icon to view the Sharing details for that specific shared dashboard. Click Close to return to the dashboard.
While you cannot edit others’ dashboards, you can save your own copy of it and make your own modifications to it. When changes are made by you, others whom you share the dashboard with will also see your changes.
Collaborating on a dashboard gives the person with whom the dashboard is shared not only the permission to view it, but also to edit the file. Any changes made will be visible to all parties who have access to the shared dashboard.
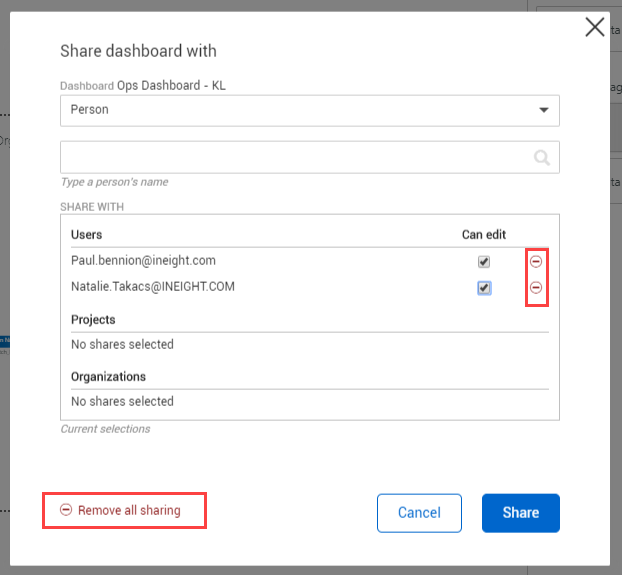
Using the process above, once you have gotten to the step of selecting who the dashboard will be shared with, in our example, we'll be sharing the dashboard with just one person.
Checking the Can Edit box and then clicking Share provides the person, project or organization the ability to collaborate with you on the shared dashboard.
For any dashboard you create and share, you may also remove sharing. By hovering over the Sharing icon, you can identify the reports you have shared with others.

Either select Remove all sharing to remove all people from sharing mode, or the click the Remove Sharing red circles next to the names of those to remove.

Embedding external content in InEight Explore means you can expose dashboards you have on your Power BI service or Tableau server in the InEight Explore application.
While your organization is still responsible for maintaining security and maintenance of the dashboards and data behind them, you can have all your dashboards in one place and it eliminates the need to bounce around different windows to look at dashboards that may contain more than just InEight Application data.
Click the Instruction icon to be taken to the Guide for embedding content in Explore.
As with other dashboards, dashboards with embedded external content can be deleted.
Sharing embedded content allows you to have one place to view all reporting and ensures that everyone in your organization is looking at the same reporting.


Additional Information
9977 N 90th Street, Suite 250 Scottsdale, AZ 85258 | 1-800-637-7496
© 2024 InEight, Inc. All Rights Reserved | Privacy Statement | Terms of Service | Cookie Policy | Do not sell/share my information
